
The lights that stayed low
Patrick of Take The Truck had a free, easy place to mount a pair of Baja Designs LP9 Pros, high on the front of his camper. He turned it down over glare in bad weather and spent an afternoon making brackets instead. A first-generation Tacoma built by someone who writes down what his decisions cost.
Built by Patrick (Take The Truck)
Owned by Lindsey (Take The Truck)
By Chad Sig · Published
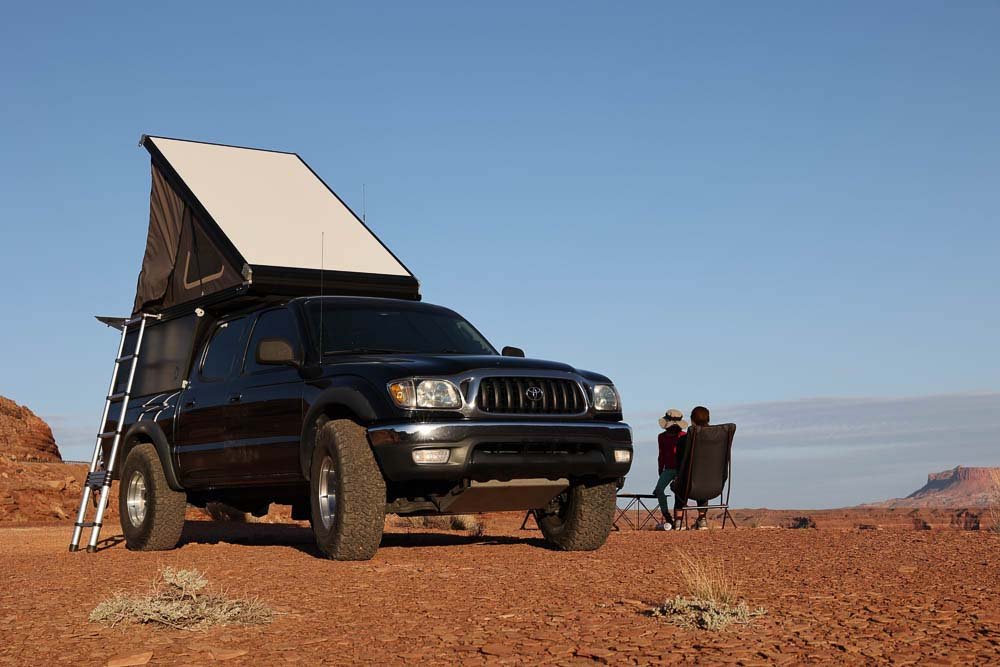
2004 Toyota Tacoma Double Cab TRD Limited, 3.4L V6, 4WD, automatic
What it is designed for
Keeping the factory bumper
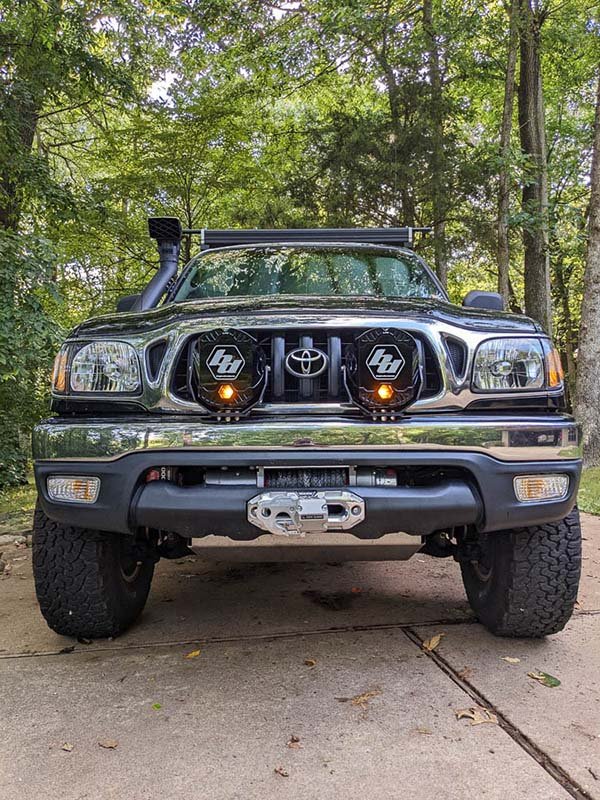
Two separate decisions at the front of this truck spend fabrication time to avoid buying an aftermarket bumper. The winch hides behind the stock one; the lights hang off brackets he cut himself.
Weather over reach
The lighting is placed for how it behaves when the air is full of dust or snow, not for how far it throws on a clear night.
Four people and a spare
Tire size, storage and sleeping platform are all bounded by what a family trip has to carry and by keeping a full-size spare in its factory home under the bed.
Serviceable a long way from home
Synthetic winch line, greasable shackles, rebuildable and externally adjustable shocks, manual locking hubs. Parts chosen to be fixed or tuned in a campsite.
The mount he did not use
Patrick and Lindsey run Take The Truck, a site and YouTube channel about truck camping with two small children. Their 2004 Tacoma was bought stock in 2022, described on their own build page as never off-roaded, and has been added to ever since. Most of it is ordinary. One decision is not.
He had a pair of Baja Designs LP9 Pros to fit and two places to put them. The Go Fast Camper on the back already had mounting points on its front rail, above the cab. The stock front bumper had nothing at all. One option was free and took minutes. The other meant cutting up leftover brackets, drilling through a bumper he liked the look of, and hoping he had measured right.
He chose the one that cost him an afternoon, and he wrote down why before he had any reason to defend it.
His reason was glare. Lights mounted up at or above your eye level illuminate the dust, snow or rain directly in front of the windscreen, and the light that scatters back off it lands in your eyes as a bright veil over everything you were trying to see. He had made the general version of this argument already, in a separate guide about choosing off-road lights, where he wrote that badly placed lights make visibility worse than stock headlights in bad conditions. The build page is that principle applied to his own truck.
The same guide rules out two more positions. Alongside the roof, he names the rear corners of the hood and the A-pillars, which is exactly where ditch lights go, and gives a second reason for avoiding them: light bouncing off the hood itself. That is the far more common version of this decision, and it is the one our field guide on ditch lights takes up.
Why the manufacturer agrees, and where it does not
Baja Designs divide the space around a vehicle into numbered lighting zones and give mounting guidance for each. For Zone 1, dust and fog, they say to mount low on the bumper and that it is important to avoid mounting or aiming those lights too high. For Zone 3, the main driving lights, they recommend that 80 percent of a lighting package stays below the hood line. So far, so much agreement with Patrick.
But they also say to mount Zone 4 and Zone 5 lights high, on the A-pillar or roofline, and they give glare reduction as the reason. Same company, same hazard, opposite instruction. The resolution is that it is beam width, not height, that decides: a wide beam lights a lot of air and must be kept below your eyeline, while a tight long-range spot lights very little and can go up. Their own LP9 range demonstrates it. The Pro and the Racer Edition are the same housing with different lenses, and Baja Designs put the Pro in Zones 1 to 3 and the Racer in Zones 4 and 5.
Patrick owns the Pro. By the manufacturer's own classification his lamp belongs low, and the place he rejected was worse than a roofline anyway: a camper front rail sits at about eye height, which is high enough to put lit air in his sightline and not tight enough a beam to earn it. The full argument, with the standards and the optics behind it, is in our field guide on ditch lights, which is where most people meet this problem from the other end.
The habit worth copying
The lighting decision is the headline. The habit behind it runs through the whole build: Patrick measures things and publishes the results, including when they contradict him.
He watched his transmission temperature on an OBD reader, saw 210 to 215 degrees in stop-and-go traffic, fitted a Hayden 678 cooler in line after the factory one so the fluid still warms properly in winter, and reported 150 to 170 degrees afterwards. He put a watt meter on his heated seats because nobody had published the draw, and found 20 watts on low and 65 on high against the 10 amps he had budgeted for. He rebuilt his sleeping platform in aluminium, saved 45 pounds, and then told his readers that plywood would have been the better material for most of them.
A builder who publishes the case against his own work is a builder whose other claims are worth taking seriously.
What we could not confirm
We have not measured this truck. Everything here is read off what Patrick published, including the photographs, which are his. He does not state the height his lamps ended up at, the angle he aimed them, which lens pattern he fitted, or whether he runs clear or amber glass. He has never published a weight for the truck either, which is worth noting because he plans heavier rear springs to carry a load he has not stated.
One number to treat carefully: his build page quotes the LP9 Pro at 11,025 forward lumens. Baja Designs' current data sheet says 10,245, and their product page says 12,547. He is presumably quoting the spec as it stood when he bought. We use the data sheet, which is the only one of the three whose figures add up.
What it gets right
The parts list on this truck is unremarkable. The reasoning behind it is written down, which is not. Patrick published why he put the lights where he put them, and he published the general principle behind it in a separate piece before the specific decision came up. Most builds show evidence of good decisions and explain none of them.
In Patrick (Take The Truck)’s own account
- He names both places he could have mounted the LP9 Pros, and gives a reason for rejecting the easy one. The camper already had brackets. The bumper had nothing.
“up high over the cab on the front of the GFC (not ideal, and we had concerns of glare issues in poor visibility weather)”
Source - The principle behind that decision is one he had already published on its own, in a guide about choosing lights. It is the backscatter argument stated without the word.
“In precipitous or dusty conditions these poorly positioned lights will illuminate these particles right in front of your windshield, making visibility worse than just using your stock headlights.”
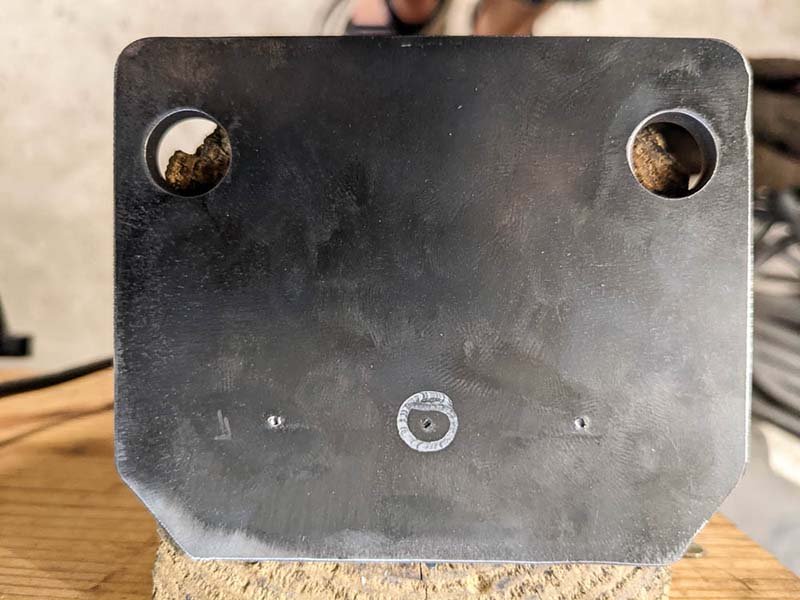
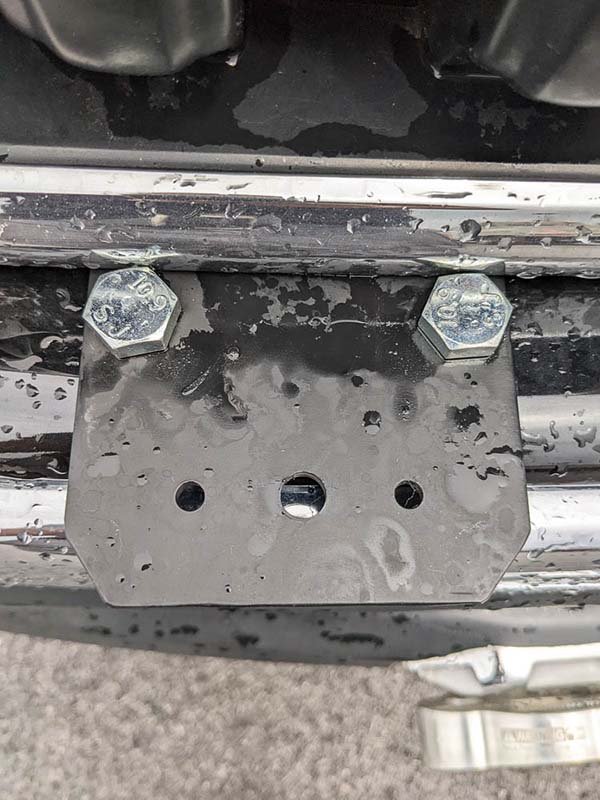
Source - The bracket work is documented down to the dimensions, which is how you can tell what the decision cost. Two half-inch holes per side through the top face of a bumper he had decided to keep.
“using some old rock slider L-brackets we had laying around in the garage, we cut them down flat to 3.25" x 4"”
Source - The tire size is argued from four constraints rather than the usual two, and the fourth is the one nobody else lists.
“This tire size allows for maximizing ground clearance without over-taxing the truck's axles and steering components off road, or requiring major modifications to the wheel well for clearance. Plus a full-size spare will still fit in the factory location under the bed.”
Source - He fitted an external transmission cooler because he had watched the temperature, not because a forum told him to, and he reports both readings.
“210-215°F in heavy stop-and-go traffic on occasion”
Measured: Monitored on a Bluetooth OBDLink MX+ reader before and after fitting a Hayden 678 cooler. After: below 200°F, usually 150 to 170°F, including summer mountain grades. - He put a meter on his heated seats because the number was not published anywhere, and found it was a factor of two below what he had assumed.
“After hooking up one of the seats to our Watt Meter to get an accurate read on the 'real life' power draw (as I couldn't find this info anywhere online), we found that each seats draw 20 watts/~1.5 amp on LOW and 65 watt/~5 amp on HIGH.”
Measured: Watt meter on one seat, on both settings. He had budgeted for about 10 amps. - The suspension was chosen over two named alternatives, on criteria that are all about living with it rather than about travel numbers.
“adjustability, serviceability, robustness, and race-truck pedigree of the ADS suspension won out”
Source
Dirtbeam’s reading
Not stated by the builder. This is what we take the build to show.
- The two decisions at the front of this truck are the same decision made twice. The hidden winch mount and the low light mount both exist to keep a factory bumper he likes, and both convert a purchase into fabrication time. He never connects them.
- The variable that actually matters in his lighting decision is not height above the ground, it is how far the lamp sits below his own eye. A camper front rail is at roughly cab-roof height, which is about where a driver's eyes are. The bumper puts the lamps around three feet lower, and that separation is what keeps the brightly lit air near the truck out of his line of sight.
- He picked the right answer for the lamp he owned rather than a rule that always holds. Baja Designs class the LP9 Pro as a Zone 1 to 3 light, and those are the zones they say to mount low. Their Racer Edition, the same housing with a tighter lens, is a Zone 4 and 5 light, and those they say to mount high. Had he bought that one, his reasoning would have pointed the wrong way.
What it gives up
Patrick states the cost of his choices more often than not, and in one case tells readers not to copy something he built himself.
In Patrick (Take The Truck)’s own account
- He rebuilt his sleeping platform in aluminium extrusion, saved 45 pounds, and then told readers not to do it.
“we would not recommend this material for a sleeping platform unless weight savings is paramount”
Measured: A 39 percent reduction against the plywood original, about 45 pounds. He does not say how he weighed it. - With the plain version for anyone who came looking for a build guide.
“For the average truck camping setup, plywood is a much easier and practical build material.”
Source - Keeping the factory front bumper is an aesthetic choice and he says so, rather than dressing it up as a performance one. The winch goes behind it on a bolt-on hidden mount.
“we kinda love the stock front bumper on these first gen Tacomas”
Source - The rear shocks are on stock mounts and cannot use their full travel until a crossmember goes in. He names it as unfinished rather than leaving it to be discovered.
“Eventually we'll weld a crossmember between the bed and frame to take better advantage of the rear shocks travel, but for now we managed to utilize the stock shock mount locations.”
Source - The engine bay got hotter once he armoured the underside, which is the cost of skid plates that almost nobody mentions. Hood louvers were the fix.
“So far it appears to have accomplished everything we had hoped it would - lowering engine bay temps by 20 to 30 degrees on average”
Source
Dirtbeam’s reading
Not stated by the builder. This is what we take the build to show.
- The hidden winch mount costs approach angle. A winch behind the stock bumper sits lower and further forward than one carried in a plate bumper, and the factory valance stays in front of it. He gains the look he wanted and pays in the angle he can climb.
- Choosing a 15-inch wheel in 2022 costs him future brake options and narrows his tire choices, and he gives the reason as looks and budget. That tradeoff is real and unstated.
- He names Deaver leaf springs as future work to handle the truck fully laden, without ever publishing what it weighs. It is the one place the build reasons from a number he does not have.
- The hood louver figure is the only number on the build with no method behind it. He gives no instrument and no before-and-after reading, which is worth noticing precisely because everything else here does.
The kit
- Lighting
- A pair of Baja Designs LP9 Pros on the front bumper, on brackets Patrick cut down from leftover rock slider L-brackets to 3.25 by 4 inches and through-bolted with M12 hardware and two-inch backing washers. The camper had mounting points already and he did not use them, because light thrown from up there would have lit the dust and snow in front of his own windscreen. The lamp is a wide one: 10,245 forward lumens from nine LEDs at 124 watts, plus 2,302 lumens from six peripheral LEDs giving a 200 degree spread. Baja Designs class it as a Zone 1 to 3 light and specify those zones low, with 80 percent of a lighting package below the hood line. His mounting choice and the manufacturer's guidance agree, and neither cites the other.
- Storage
- An 8020 aluminium extrusion sleeping platform with a 58 inch drawer and a hydraulic-assisted lift for the stove, replacing a plywood original and saving about 45 pounds. Maxtrax Xtreme boards ride on the roof rack on homemade pins and quarter-inch aluminium flat stock, padlockable. The rack itself is a cut-down 60 inch Thule T-track set, bent to the roof contour and set on rivnuts in marine sealant, carrying Sherpa load bars. Patrick's own verdict on the platform is that plywood would have been the better call for most people.
- Recovery
- A Warn M8000 carried over from the previous truck, on an Amp'd Up bolt-on hidden mount that uses the factory recovery points and crossmember bolts, so the stock bumper stays. Warn Spydura synthetic line and a Factor 55 UltraHook, chosen for weight, safety and being repairable in the field. The fairlead is a Warn Epic 1.5 inch hawse, thicker than standard, to clear the factory bumper plastics and take some stress off the line: a small part that exists only because of the decision to keep the bumper.